T3UXW09 Podcasts – Teil 1

Im ersten von fünf Podcasts zur T3UXW09 präsentieren Jens Hofmann und Andreas Beutel die Ergebnisse von Team 1 der TYPO3 User Experience Week 2009. Die T3UXW09 war im November 2009 im Thüringischen Behringen zur Verbesserung der Usability des TYPO3-Backends durchgeführt worden und hatte viele konkrete Verbesserungen erreicht, die zum Teil bereits in Version 4.3 eingeflossen sind. Die folgenden Podcasts sollen nun im Abstand von zwei Tagen veröffentlicht werden.

Im ersten Podcast zur T3UXW09 werden folgende Anpassungen vorgestellt

  • umsortierte Backend-Formulare
  • überarbeitete Page-Modul mit Drag&Drop
  • Backend-Grid-Editor1
  • ExtJS basierte Backend-Suche

Diese Features sind bisher nicht in TYPO3 Version 4.4 eingeflossen, das bereits einen Feature-Freeze erfahren hat. Die Integration in Version 4.5 zum Ende 2010 ist aber erklärtes Ziel. Team 1 bestand aus Jens Hoffmann, Kian Gould, Thomas Hempel, Jo Hasenau, Timo Schmidt und Michael Klapper.

Backend-Grid-Editor
Damit kann ein Entwickler die Ansicht im Backend an das Frontend-Layout anpassen. Das Modul steht zum Test auf Forge zur Verfügung.

Podcast als MP4, auf der TYPO3-Seite oder kostenlos in iTunes abonnieren.

Sexy Album Overlays

Rogie King hat in seinem Blog ein sehr schönes Template für die Darstellung von Musik-Hüllen im Web erzeugt. Es gibt ein CD-Jewel-Case, eine CD und eine Schallplatte (Vinyl mit Hülle). Die Dateien (HTML, CSS, Bilder) hat er freundlicherweise auch zum Download zur Verfügung gestellt.

album_banner.jpg

YAML-Template für TYPO3 jetzt unter der GPL

Seit dem 1. September 2008 stehen alle aktuellen und künftigen Versionen des YAML-Templates (basiert auf dem bekannten CSS-Baukasten YAML) unter der GPL und dürfen kostenlos und ohne Zahlung einer Lizenzgebühr auch komerziell verwendet werden.

Der Entwickler des TYPO3 Templates schreibt:

Warum dieser Schritt?
Abgesehen von den Querelen, die sich mit der Auszahlung der Einnahmen aus den Lizenzverkäufen an mich ergeben haben, habe ich dies schon seit längerer Zeit überlegt und geplant. Die Antwort ist ganz einfach. Ein freies und quelloffenes CMS wie TYPO3 lebt davon, daß soviele Entwickler wie möglich dazu beitragen, daß es besser und leistungsfähiger wird. Lizenzgebühren für ein einzelnes Modul zu verlangen, paßt nicht zum Konzept von TYPO3.

Anders als das TYPO3-Template steht YAML selbst weiterhin unter der Creative Commons Lizenz (CC-A 2.0), also die Attribution Lizenz. Das heisst, für die kostenfreie Nutzung des YAML-Frameworks ist die Rückverlinkung zur YAML-Homepage in der Fußzeile der Website oder im Impressum vorgeschrieben.

Web Inspector Redesign

Timothy Hatcher writes:

Web Inspector Redesign: It has been nine months since our last Web Inspector update and we have a lot of cool things to talk about. If you diligently use the Web Inspector in nightly builds, you might have seen some of these improvements, while other subtle changes might have gone unnoticed.

Some of the Web Inspector improvements were contributed by members of the WebKit community. We really want to get the whole community involved with making this the best web development tool available. Remember, most of the Web Inspector is written in HTML, JavaScript, and CSS, so it’s easy to get started making changes and improvements.

Redesigned Interface

First and foremost, the Web Inspector is now sporting a new design that organizes information into task-oriented groups — represented by icons in the toolbar. The toolbar items (Elements, Resources, Scripts, Profiles and Databases) are named after the fundamental items you will work with inside the respective panels.

Console

The Console is now accessible from any panel. Unlike the other panels, the Console is not just used for one task — it might be used while inspecting the DOM, debugging JavaScript or analyzing HTML parse errors. The Console toggle button is found in the status bar, causing it to animate in and out from the bottom of the Web Inspector. The Console can also be toggled by the Escape key.

Error and warning counts are now shown in the bottom right corner of the status bar. Clicking on these will also open the Console.

In addition to the visual changes to the Console, we have also greatly improved usability by adding auto-completion and tab-completion. As you type expressions, property names will automatically be suggested. If there are multiple properties with the same prefix, pressing the Tab key will cycle through them. Pressing the Right arrow key will accept the current suggestion. The current suggestion will also be accepted when pressing the Tab key if there is only one matched property.

Our compatibility with Firebug’s command line and window.console APIs has also been greatly improved by Keishi Hattori (服部慶士), a student at The University of Tokyo (東京大学) who tackled this area as a summer project.

Elements Panel

The Elements panel is largely the same as the previous DOM view — at least visually. Under the hood we have made number of changes and unified everything into one DOM tree.

  • Descend into sub-documents — expanding a frame or object element will show you the DOM tree for the document inside that element.
  • Automatic updates — the DOM tree will update when nodes are added to or removed from the inspected page.
  • Inspect clicked elements — enabling the new inspect mode lets you hover around the page to find a node to inspect. Clicking on a node in the page will focus it in the Elements panel and turn off the inspect mode. This was contributed by Matt Lilek.
  • Temporarily disable style properties — hovering over an editable style rule will show checkboxes that let you disable individual properties.

  • Style property editing — double click to edit a style property. Deleting all the text will delete the property. Typing or pasting in multiple properties will add the new properties.
  • Stepping for numeric style values — while editing a style property value with a number, you can use the Up or Down keys to increment or decrement the number. Holding the Alt/Option key will step by 0.1, while holding the Shift key will step by 10.

  • DOM attribute editing — double click to edit a DOM element attribute. Typing or pasting in multiple attributes will add the new attributes. Deleting all the text will delete the attribute.
  • DOM property editing — double click to edit a DOM property in the Properties pane. Deleting all the text will delete the property, if allowed.
  • Metrics editing — double click to edit a any of the CSS box model metrics.
  • Position metrics — the Metrics pane now includes position info for absolute, relative and fixed positioned elements.

Resources Panel

The Resources panel is a supercharged version of the previous Network panel. It has a similar looking timeline waterfall, but a lot has been done to make it even more useful.

  • Graph by size — click Size in the sidebar to quickly see the largest resources downloaded.
  • Multiple sorting options — there are many sorting methods available for the Time graph, including latency and duration.
  • Latency bars — the Time graph now shows latency in the bar with a lighter shade. This is the time between making the request and the server’s first response.
  • Unified resource views — clicking a resource in the sidebar will show you the data pulled from the network (not downloaded again), including the request and response headers.
  • View XHRs — the time and size graphs also show XMLHttpRequests. Selecting an XHR resource in the sidebar will show the XHR data and headers.

Scripts Panel

The previous standalone Drosera JavaScript debugger has been replaced with a new JavaScript debugger integrated into the Web Inspector. The new integrated JavaScript debugger is much faster than Drosera, and should be much more convenient.

From the Scripts panel you can see all the script resources that are part of the inspected page. Clicking in the line gutter of the script will set a breakpoint for that line of code. There are the standard controls to pause, resume and step through the code. While paused you will see the current call stack and in-scope variables in the right-hand sidebar.

The Web inspector has a unique feature regarding in-scope variables: it shows closures, ‘with’ statements, and event-related scope objects separately. This gives you a clearer picture of where your variables are coming from and why things might be breaking (or even working correctly by accident).

Profiles Panel

The brand new JavaScript Profiler in the Profiles panel helps you identify where execution time is spent in your page’s JavaScript functions. The sidebar on the left lists all the recorded profiles and a tree view on the right shows the information gathered for the selected profile. Profiles that have the same name are grouped as sequential runs under a collapsible item in the sidebar.

There are two ways to view a profile: bottom up (heavy) or top down (tree). Each view has its own advantages. The heavy view allows you to understand which functions have the most performance impact and the calling paths to those functions. The tree view gives you an overall picture of the script’s calling structure, starting at the top of the call-stack.

Below the profile are a couple of data mining controls to facilitate the dissection of profile information. The focus button (Eye symbol) will filter the profile to only show the selected function and its callers. The exclude button (X symbol) will remove the selected function from the entire profile and charge its callers with the excluded function’s total time. While any of these data mining features are active, a reload button is available that will restore the profile to its original state.

WebKit’s JavaScript profiler is fully compatible with Firebug’s console.profile() and console.profileEnd() APIs, but you can also specify a title in console.profileEnd() to stop a specific profile if multiple profiles are being recorded. You can also record a profile using the Start/Stop Profiling button in the Profiles panel.

Databases Panel

The Databases panel lets you interact with HTML 5 Database storage. You can examine the contents of all of the page’s open databases and execute SQL queries against them. Each database is shown in the sidebar. Expanding a database’s disclosure triangle will show the database’s tables. Selecting a database table will show you a data grid containing all the columns and rows for that table.

Selecting a database in the sidebar will show an interactive console for evaluating SQL queries. The input in this console has auto-completion and tab-completion for common SQL words and phrases along with table names for the database.

Search

Accompanying the task-oriented reorganization, the search field in the toolbar now searches the current panel with results being highlighted in the context of the panel. Targeting the search to the current panel allows each panel to support specialized queries that are suited for the type of information being shown. The panels that support specialized queries are Elements and Profiles.

The Elements panel supports XPath and CSS selectors as queries in addition to plain text. Any search you perform will be attempted as a plain text search, a XPath query using document.evaluate() and a CSS selector using document.querySelectorAll(). All the search results will be highlighted in the DOM tree, with the first match being revealed and selected.

The Profiles panel supports plain text searches of the function names and resource URLs. Numeric searches are also supported that match rows in the profile’s Self, Total and Calls columns. To facilitate powerful numeric searching, there are a few operators and units that work to extend or limit your results. For example you can search for ‘> 2.5ms’ to find all the functions that took longer than 2.5 milliseconds to execute. In addition to ‘ms’, the other supported units are: ‘s’ for time in seconds and ‘%’ for percentage of time. The other supported operators are ‘< ’, ‘<=’, ‘>=’ and ‘=’. When no units are specified the Calls column is searched.

In all the panels pressing Enter in the search field or ⌘G (Ctrl+G on Windows and Linux) will reveal the next result. Pressing ⇧⌘G (Ctrl+Shift+G on Windows and Linux) will reveal the previous result. In the Resources, Scripts and Profiles panels the search will be performed on the visible view first and will automatically jump to the first result only if the visible view has a match.

Available Now and Contributing

All of these things are available now in the Mac and Windows nightly builds. Give them a try today, and let us know what you like (or don’t like).

If you would like to contribute, there are some really interesting tasks in the list of Web Inspector bugs and enhancements, and other contributors in the #webkit chat room are pretty much always available to provide help and advice.“

(Via Surfin‘ Safari.)

A Closer Look at YUI 3.0 PR 1: Dav Glass’s Draggable Portal Example

A Closer Look at YUI 3.0 PR 1: Dav Glass’s Draggable Portal Example: „

YUI 3.0 Preview Release 1 was made available on Wednesday, and with it we provided a look at how the next major iteration of YUI is taking shape. Among the elements we shipped with the preview is a new example from Dav Glass, the Draggable Portal, which exercises a broad cross section of the preview’s contents.

The Portal Example in the YUI 3.0 preview release.

The Draggable Portal is a common design pattern in which content modules on the page can be repositioned, minimized, removed, and re-added to the page. The state of the modules persists in the background, so a reload of the page or a return to the page calls up the modules in their most recently positioned state. You see variations of this design pattern on many personlizable portals like My Yahoo, NetVibes, and iGoogle.

In this article, we’ll take a look under the hood of this example to get a richer sense of YUI’s 3.x codeline and the idioms and patterns it establishes. We’re just pulling out some specific code snippets to examine here, but you can review the full code source for this exampleand for 66 others — on the YUI 3 website.

(more…)

(Via Yahoo! User Interface Blog.)

YUI 3.0 Preview Release 1

YUI 3.0 Preview Release 1: „

YUI 3.0 Preview 1 website.The YUI team is pleased to announce the public availability of YUI 3.0 Preview Release 1, an early look at what we’re working on for the next generation of the YUI Library. Documentation for YUI 3.0 is on the YUI website; the download is available on the YUI project area on SourceForge; you can find us with questions or comments on the YUI 3.x discussion forum. Keep in mind that this is an early preview, not a production-quality (or even a beta) release. This release is not suitable for production use, but it will give you an idea of what we’re working on, and it should provide a good framework for conversation about the future of the library.

Five Goals for YUI 3:

We’ve talked to thousands of YUI users over the past 30 months, and based on that feedback we’ve set five design goals for the next generation of the library. What you’ve told us is that YUI 3.0 should be:

  • lighter (less K-weight on the wire and on the page for most uses)
  • faster (fewer http requests, less code to write and compile, more efficient code)
  • more consistent (common naming, event signatures, and widget APIs throughout the library)
  • more powerful (do more with less implementation code)
  • more securable (safer and easier to expose to multiple developers working in the same environment; easier to run under systems like Caja or ADsafe)

With this early release, we’ve made progress toward most of these objectives — and we believe we have the right architecture in place to meet all five as we move to GA over the next few quarters.

What’s New in YUI 3.0?

When you start to write code using YUI 3.0, you’ll notice some changes in structure and style. Here’s a taste:

Snippet: What it does:
YUI().use('node', function(Y) {
    Y.get('#demo').addClass('enabled');
});
Creates a YUI instance with the node module (and any dependencies) and adds the class ‚enabled‘ to the element with the id of ‚demo‘.
YUI().use('dd-drag', function(Y) {
        var dd = new Y.DD.Drag({
        node: '#demo'
    });
});
Creates an instance of YUI with basic drag functionality (a subset of the dd module), and makes the element with the id of ‚demo‘ draggable.
Y.all('.demo').addClass('enabled');
Adds the class ‚enabled‘ to the all elements with the className ‚demo‘.
Y.all('.demo').set('title', 'Ready!').removeClass('disabled');
Sets the title attribute of all elements with the className ‚demo‘ and removes the class ‚disabled‘ from each.
Y.get('#demo').plug(Y.Plugin.Drag, {
    handles: 'h2'
});
Adds the Drag plugin to the element with the id ‚demo‘, and enables all of its h2 children drag as handles.
Y.on('click', function(e) {
    e.preventDefault();
    e.target.query('em').set('innerHTML', 'clicked');
}, '#demo a');
Attaches a DOM event listener to all anchor elements that are children of the element with the id ‚demo‘. The event handler prevents the anchor from navigating and then sets a value for the innerHTML of the first em element of the clicked anchor.

What’s different here?

  • Sandboxing: Each YUI instance on the page can be self-contained, protected and limited (YUI().use()). This segregates it from other YUI instances, tailors the functionality to your specific needs, and lets different versions of YUI play nicely together.
  • Modularity: YUI 3 is architected to use smaller modular pieces, giving you fine-grained control over what functionality you put on the page. If you simply want to make something draggable, you can include the dd-drag submodule, which is a small subset of the Drag & Drop Utility.
  • Self-completing: As long as the basic YUI seed file is in place, you can make use of any functionality in the library. Tell YUI what modules you want to use, tie that to your implementation code, and YUI will bring in all necessary dependencies in a single HTTP request before executing your code.
  • Selectors: Elements are targeted using intuitive CSS selector idioms, making it easy to grab an element or a group of elements whenever you’re performing an operation.
  • Custom Events++: Custom Events are even more powerful in YUI 3.0, with support for bubbling, stopping propagation, assigning/preventing default behaviors, and more. In fact, the Custom Event engine provides a common interface for DOM and API events in YUI 3.0, creating a consistent idiom for all kinds of event-driven work.
  • Nodes and NodeLists: Element references in YUI 3.0 are mediated by Node and NodeList facades. Not only does this make implementation code more expressive (Y.Node.get('#main ul li').addClass('foo');), it makes it easier to normalize differences in browser behavior (Y.Node.get('#promo').setStyle('opacity', .5);).
  • Chaining: We’ve paid attention throughout the new architecture to the return values of methods and constructors, allowing for a more compressed chaining syntax in implementation code.

And that’s just the beginning. Dive into the examples to learn more and to see the preview release in action, including some hidden gems like full A-Grade cross-domain requests. Our resident metahacker Dav Glass created a nice multi-component example, the draggable portal, that will give you some sense of what’s included in today’s preview.

Is YUI 3.0 Backward Compatible with YUI 2.x?

No. YUI 3.0 builds off of the YUI 2.x codeline, but we’ve evolved most of the core APIs in working toward the five key goals described above. As a result, migrating from YUI 2.x to 3.x will require effort at the implementation level.

We know that ease-of-migration will be a critical factor for all YUI users. We’re taking two important steps to facilitate the transition as it arrives:

  • Limited compatibility layer: YUI 3.0 will ship with a limited compatibility layer for the current YUI Core (Yahoo Global Object, Dom Collection, and Event Utility). This will allow you to run many of your YUI 2.x-based implementations on top of YUI 3.0. We’re not shipping the compatibility layer with today’s preview, but you’ll see it appear in a future preview or beta release prior to GA.
  • Full parallel compatibility: YUI 3.0 can be run in parallel to YUI 2.x with no side effects for either version. If you choose to make the transition in stages, you can run the full 2.x stack and 3.x stack together as needed.

Even with these provisions in place, we know that an API change (along with new concepts and idioms) has a real cost for everyone involved. We’re convinced that this change is both necessary and worth the effort, and obviously we’re going to work hard to make the value proposition compelling.

What’s Next?

YUI 3.0 is a work in progress. The common widget framework for 3.0 is not included in this preview and we’re continuing to work on refinements to the core — including optimizations to the package structure to minimize base K-weight. We anticipate the next two releases coming up as follows:

  • October 2008 — PR2: Widget Framework, sample widgets, additional utilities.
  • December 2008 — Beta 1: Final mix of module structures, API completion, full complement of utilities.

We have some great stuff to share as we move further along in this process. We’ve never been more excited about YUI and its future — and we think YUI 3.0 will have a big role to play in that future.

(Via Yahoo! User Interface Blog.)

W3C Releases Mobile Web Best Practices

W3C Releases Mobile Web Best Practices: „

The World Wide Web Consortium (W3C) today released the 1.0 version of their Mobile Web Best Practices document. The guidelines offer mobile web developers a consistent set of best practices to apply when creating content for consumption on mobile devices. ‘The principal objective is to improve the user experience of the Web when accessed from [mobile web] devices,’ according to the W3C.

In Japan, there are already more mobile web users than PC users, and the rest of the world is catching up. Jupiter Research expects that mobile Web 2.0 revenues will hit $22.4 billion by 2014, with the biggest growth areas in mobile social networking and user generated content.

Developing content across such a wide array of mobile devices and creating a consistent and enjoyable user experience is not an easy task. The W3C hopes that its new mobile best practices guidelines will make it easier for developers to create content and applications for cell phones and other mobile devices.

‘Mobile Web content developers now have stable guidelines and maturing tools to help them create a better mobile Web experience,’ said Dominique Hazaël-Massieux, W3C Mobile Web Activity Lead in a press release. ‘In support of the W3C mission of building One Web, we want to support the developer community by providing tools to enable a great mobile Web user experience.’

The W3C also announced the release of the XHTML Basic 1.1 Recommendation today as the preferred markup language for the best practices document. ‘Until today, content developers faced an additional challenge: a variety of mobile markup languages to choose from,’ said the W3C. ‘With the publication of the XHTML Basic 1.1 Recommendation today, the preferred format specification of the Best Practices, there is now a full convergence in mobile markup languages, including those developed by the Open Mobile Alliance (OMA).’“

(Via SitePoint Blogs.)

Non-blocking JavaScript Downloads

Non-blocking JavaScript Downloads:

External JavaScript files block downloads and hurt your page performance, but there is an easy way to work around this problem: use dynamic scripts tags and load scripts in parallel, improving the page loading speed and the user experience.

The problem: scripts block downloads

Let’s first take a look at what the problem is with the script downloads. The thing is that before fully downloading and parsing a script, the browser can’t tell what’s in it. It may contain document.write() calls which modify the DOM tree or it may even contain location.href and send the user to a whole new page. If that happens, any components downloaded from the previous page may never be needed. In order to avoid potentially useless downloads, browsers first download, parse and execute each script before moving on with the queue of other components waiting to be downloaded. As a result, any script on your page blocks the download process and that has a negative impact on your page loading speed.

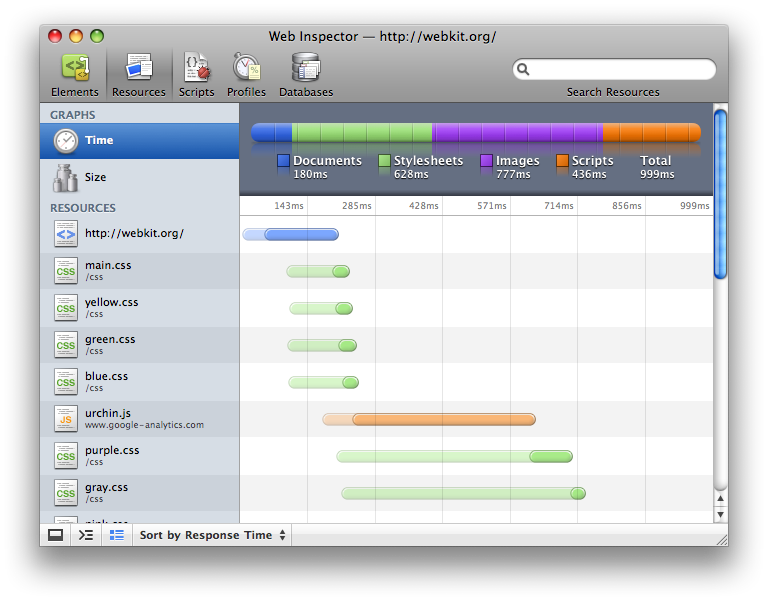
Here’s how the timeline looks like when downloading a slow JavaScript file (exaggerated to take 1 second). The script download (the third row in the image) blocks the two-by-two parallel downloads of the images that follow after the script:

Timeline - Blocking behavior of JavaScript files

Here’s the example to test yourself.

Problem 2: number of downloads per hostname

Another thing to note in the timeline above is how the images following the script are downloaded two-by-two. This is because of the restriction of how many components can be downloaded in parallel. In IE <= 7 and Firefox 2, it’s two components at a time (following the HTTP 1.1 specs), but both IE8 and FF3 increase the default to 6.

You can work around this limitation by using multiple domains to host your components, because the restriction is two components per hostname. For more information of this topic check the article ‘Maximizing Parallel Downloads in the Carpool Lane’ by Tenni Theurer.

The important thing to note is that JavaScripts block downloads across all hostnames. In fact, in the example timeline above, the script is hosted on a different domain than the images, but it still blocks them.

Scripts at the bottom to improve user experience

As Yahoo!’s Performance rules advise, you should put the scripts at the bottom of the page, towards the closing </body> tag. This doesn’t really make the page load faster (the script still has to load), but helps with the progressive rendering of the page. The user perception is that the page is faster when they can see a visual feedback that there is progress.

Non-blocking scripts

It turns out that there is an easy solution to the download blocking problem: include scripts dynamically via DOM methods. How do you do that? Simply create a new <script> element and append it to the <head>:

var js = document.createElement('script');
js.src = 'myscript.js';
var head = document.getElementsByTagName('head')[0];
head.appendChild(js);

Here’s the same test from above, modified to use the script node technique. Note that the third row in the image takes just as long to download, but the other resources on the page are loading simultaneously:

Non-blocking JavaScript timeline

Test example

As you can see the script file no longer blocks the downloads and the browser starts fetching the other components in parallel. And the overall response time is cut in half.

Dependencies

A problem with including scripts dynamically would be satisfying the dependencies. Imagine you’re downloading 3 scripts and three.js requires a function from one.js. How do you make sure this works?

Well, the simplest thing is to have only one file, this way not only avoiding the problem, but also improving performance by minimizing the number of HTTP requests (performance rule #1).

If you do need several files though, you can attach a listener to the script’s onload event (this will work in Firefox) and the onreadystatechange event (this will work in IE). Here’s a blog post that shows you how to do this. To be fully cross-browser compliant, you can do something else instead: just include a variable at the bottom of every script, as to signal ‘I’m ready’. This variable may very well be an array with elements for every script already included.

Using YUI Get utility

The YUI Get Utility makes it easy for you to use script includes. For example if you want to load 3 files, one.js, two.js and three.js, you can simply do:

var urls = ['one.js', 'two.js', 'three.js'];
YAHOO.util.Get.script(urls);

YUI Get also helps you with satisfying dependencies, by loading the scripts in order and also by letting you pass an onSuccess callback function which is executed when the last script is done loading. Similarly, you can pass an onFailure function to handle cases where scripts fail to load.

var myHandler = {
    onSuccess: function(){
        alert(':))');
    },
    onFailure: function(){
        alert(':((');
    }
};

var urls = ['1.js', '2.js', '3.js'];
YAHOO.util.Get.script(urls, myHandler);

Again, note that YUI Get will request the scripts in sequence, one after the other. This way you don’t download all the scripts in parallel, but still, the good part is that the scripts are not blocking the rest of the images and the other components on the page. Here’s a good example and tutorial on using YUI Get to load scripts.

YUI Get can also include stylesheets dynamically through the method
YAHOO.util.Get.css() [example].

Which brings us to the next question:

And what about stylesheets?

Stylesheets don’t block downloads in IE, but they do in Firefox. Applying the same technique of dynamic inserts solves the problem. You can create dynamic link tags like this:

var h = document.getElementsByTagName('head')[0];
var link = document.createElement('link');
link.href = 'mycss.css';
link.type = 'text/css';
link.rel = 'stylesheet';
h.appendChild(link);

This will improve the loading time in Firefox significantly, while not affecting the loading time in IE.

Another positive side effect of the dynamic stylesheets (in FF) is that it helps with the progressive rendering. Usually both browsers will wait and show blank screen until the very last piece of stylesheet information is downloaded, and only then they’ll start rendering. This behavior saves them the potential work of re-rendering when new stylesheet rules come down the wire. With dynamic <link>s this is not happening in Firefox, it will render without waiting for all the styles and then re-render once they arrive. IE will behave as usual and wait.

But before you go ahead and implement dynamic <link> tags, consider the violation of the rule of separation of concerns: your page formatting (CSS) will be dependent on behavior (JS). In addition, this problem is going to be addressed in future Firefox versions.

Other ways?

There are other ways to achieve the non-blocking scripts behavior, but they all have their drawbacks.

Method Drawback
Using defer attribute of the script tag IE-only, unreliable even there
Using document.write() to write a script tag
  1. Non-blocking behavior is in IE-only
  2. document.write is not a recommended coding practice
XMLHttpRequest to get the source then execute with eval().
  1. eval() is evil’
  2. same-domain policy restriction
XHR request to get the source, create a new script tag and set its content
  1. more complex
  2. same-domain policy
Load script in an iframe
  1. complex
  2. iframe overhead
  3. same-domain policy

Future

Safari and IE8 are already changing the way scripts are getting loaded. Their idea is to download the scripts in parallel, but execute them in the sequence they’re found on the page. It’s likely that one day this blocking problem will become negligible, because only a few users will be using IE7 or lower and FF3 or lower. Until then, a dynamic script tag is an easy way around the problem.

Summary

  • Scripts block downloads in FF and IE browsers and this makes your pages load slower.
  • An easy solution is to use dynamic <script> tags and prevent blocking.
  • YUI Get Utility makes it easier to do script and style includes and manage dependencies.
  • You can use dynamic <link> tags too, but consider the separation of concerns first.

(Via Yahoo! User Interface Blog.)

Conditional Comments for HTML Email

Conditional Comments for HTML Email: „

Take a look at this:

<!--[if gte mso 9]>

<![endif]-->

Chances are the general syntax will be instantly familiar — it’s a conditional comment, useful for feeding specific content only to Windows versions of Internet Explorer. But did you know they work for Office applications too?

Neither did I … until recently.

We’ve just overhauled the HTML templates for our email newsletters … a painful process to be sure — if you think that web browsers are harsh task-masters, you should try coding to suit email clients! A recent article, How to Code HTML Email Newsletters, spells out just how convoluted it can be, and how arcane are the techniques you have to resort to, to produce a decent layout in the most popular email clients. And the issue has been further complicated by the fact that one of the most popular Windows clients — Outlook — no longer uses Internet Explorer for HTML rendering, it uses Word!

And it was while perusing the franken-code that passes for ‘Save as Web Page’ output from a Word document, that I first saw these little nuggets — exactly what we needed to hide bits of content from Outlook that were just too mangled to leave.

So there you go. If you’re publishing HTML email and struggling with Outlook’s rendering, here’s an extra little tool for the kit. The syntax even implies that it can be used for granular targetting of Office versions all the way back; but I haven’t tested this, so any information is gratefully received :)

(Via SitePoint Blogs.)